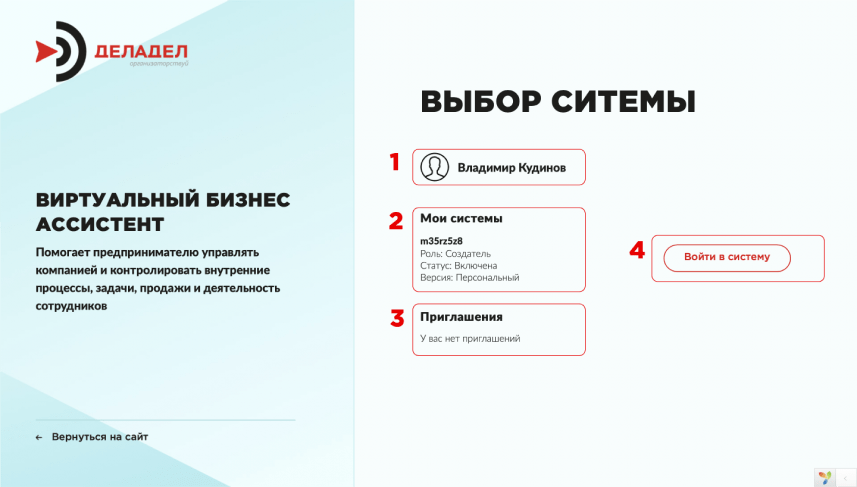
В окне выбора систем доступна следующая информация:
1. Ваш аватар, имя и фамилия.
2. List of systems in which you are a member.
This can be only one system in which you are the creator (Administrator) and an unlimited number of systems in which you can be an invited employee.
3. В данном разделе Вы будете видеть приглашения в системы. Приглашения формируются при добавлении Вас как сотрудника в систему, при этом приглашение придет на Вашу почту, и Вам останется только принять приглашение на участие в системе или отказаться от участия.
4. Напротив каждой системы доступна кнопка “Войти в систему”. Покинуть же систему Вы можете в “личном кабинете” после входа, уже находясь внутри системы.
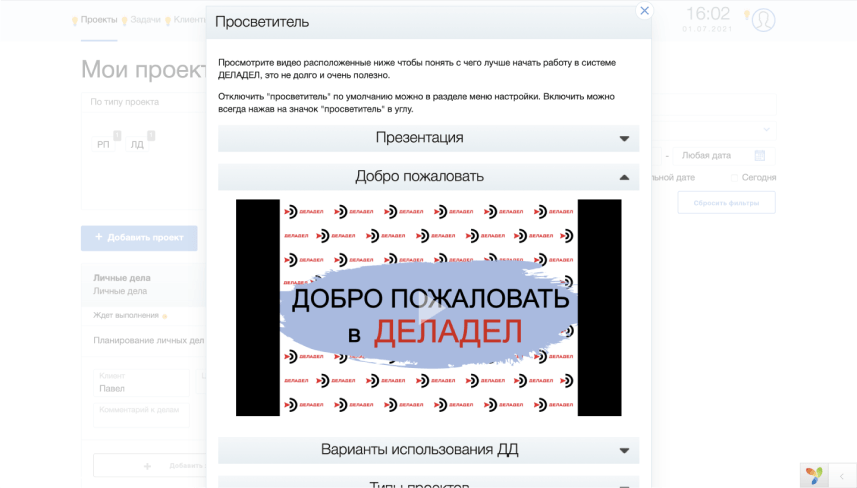
После первого входа Вам будет предложено ознакомиться с видеоинструкциями функции “Просветитель”, в которых рассказано о ключевых аспектах работы системы, приведены примеры использования и описание системы в целом, и более детально по разделам. Для того чтобы окно “Просветитель” не открывалось автоматически достаточно отключить функцию автоматического включения в разделе “Настройки” главного(верхнего) меню системы.

После первого входа Вам будет предложено ознакомиться с видеоинструкциями функции “Просветитель”, в которых рассказано о ключевых аспектах работы системы, приведены примеры использования и описание системы в целом, и более детально по разделам. Для того чтобы окно “Просветитель” не открывалось автоматически достаточно отключить функцию автоматического включения в разделе “Настройки” главного(верхнего) меню системы.

После первого входа Вам будет предложено ознакомиться с видеоинструкциями функции “Просветитель”, в которых рассказано о ключевых аспектах работы системы, приведены примеры использования и описание системы в целом, и более детально по разделам. Для того чтобы окно “Просветитель” не открывалось автоматически достаточно отключить функцию автоматического включения в разделе “Настройки” главного(верхнего) меню системы.
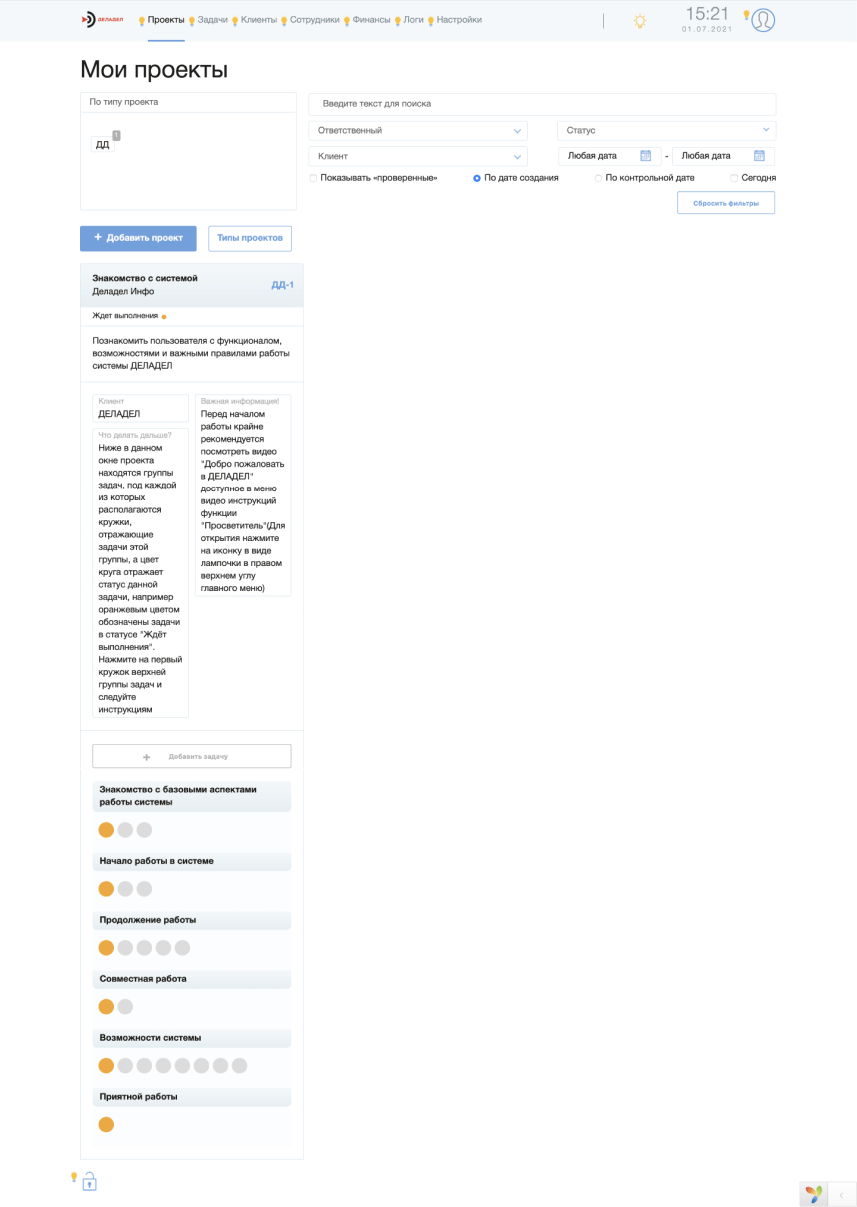
После первого входа в систему пользователь сможет пройти интерактивное ознакомление с системой ознакомившись с информацией в проекте “Знакомство с системой”, и выполнив задачи данного проекта. Содержание проектов “Знакомство с системой” для пользователей с правами “Администратор” и приглашенных пользователей будут разными и опишут только актуальный для данного пользователя функционал.
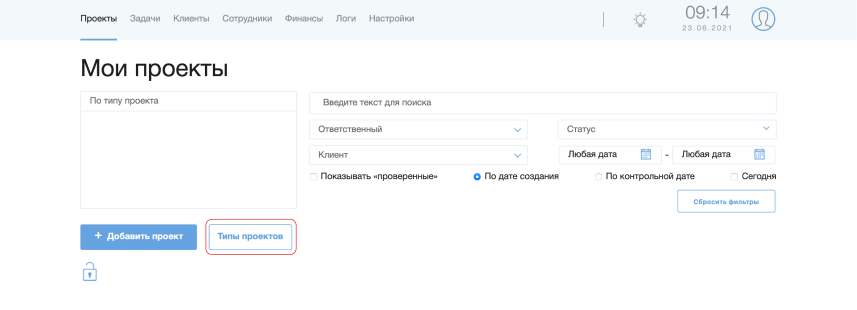
To get started, the system will need to create a “Section” for accounting. It can be for example “Personal affairs” or “My business”. Creating different Sections allows you to separate different areas of keeping records of tasks and projects that are maintained in DELADEL. After creating a Section, you can add an unlimited number of projects of this type, for example, dividing the accounting of the Section “My business” into “Organizational moment”, “Operational activity”, “Accounting”, “Personnel accounting”, etc. At the same time, you can create a Section “Customer Care” and keep track of customer relationships in another Section. For convenience and increase the speed of working with different Sections, instant filters by Section and content details are provided, which will help you find the desired project or task as quickly as possible.
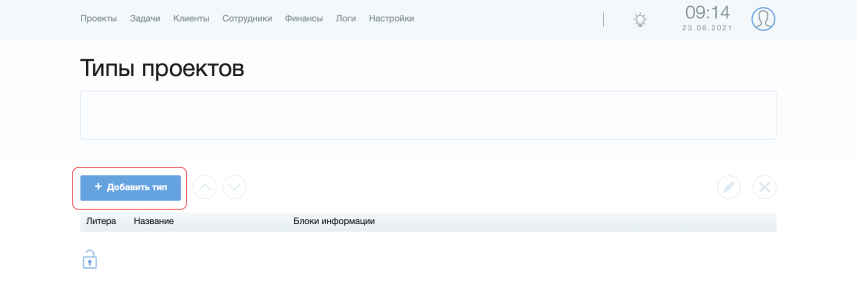
Добавление типов преоктов предусмотрено на стренице “Разделы” попасть на которую можно из общего раздела “Проекты”. Для добавление типа проекта нужно нажать на кнопку “+Добавить раздел” и далее следовать инструкции (подробности дальше)
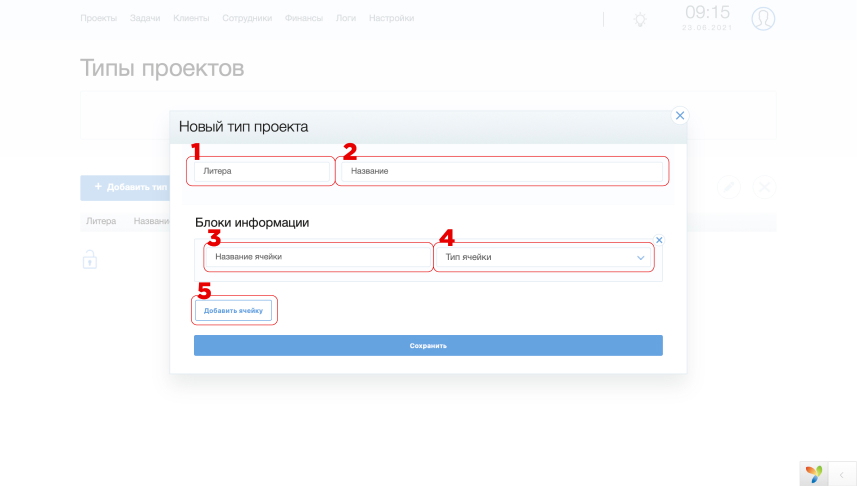
Каждый Раздел содержит набор полей:
1. Литера - это сокращенная до двух символов аббревиатура полного названия типа проекта, которая будет видна в панели фильтров по типу проекта для оперативного фильтрования проектов того или иного типа.
Каждому создаваемому проекту присваивается уникальный номер вида “Литера-порядковый номер”, например первый проект типа проектов “Личные дела” с литерой “ЛД” - получит номер “ЛД-1”
2. Название - это полное название типа проектов, например “Личные дела”(ЛД), “Мой бизнес”(МБ) и т.п. - название Вы выбираете сами, так же как и все остальные поля.
3. Блоки информации - это настраиваемые окошки данных, которые будут отображаться для каждого создаваемого проекта данного типа. Например для типа проектов “Активные проекты” это могут быть поля “Дата начала сотрудничества”, “Сумма договора”, “Рамвер предоплаты” “Контактный емейл” или другая важная информация которую хотелось бы всегда иметь на виду. В это же время для типа проектов “Личные дела” такие блоки скорее всего будут просто не нужны, и их можно не добавлять, разделяя сами созданные проекты по названием, например “Бытовые дела”(ЛД-1), “Семейные дела”(ЛД-2), “Досуг”(ЛД-3) и т.д.
4. Для каждой ячейки предусмотрена возможность выбрать её свойства. Так например выбирая тип ячейки со значением “Дата” при выборе этой ячейки будет возникать календарь с возможностью выбора даты.
5. Вы можете добавить любое количество ячеек в раздел Инфоблоки
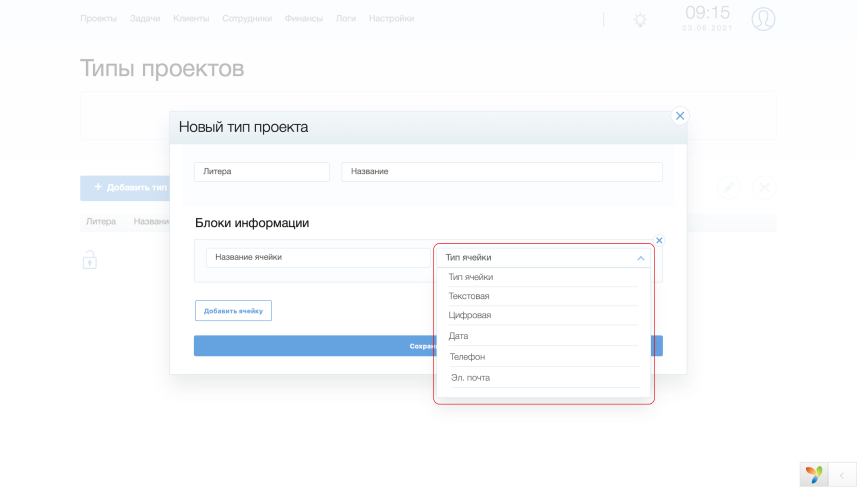
Для каждой ячейки предусмотрена возможность выбрать её свойства. Так например выбирая тип ячейки со значением “Дата” при выборе этой ячейки будет возникать календарь с возможностью выбора даты.
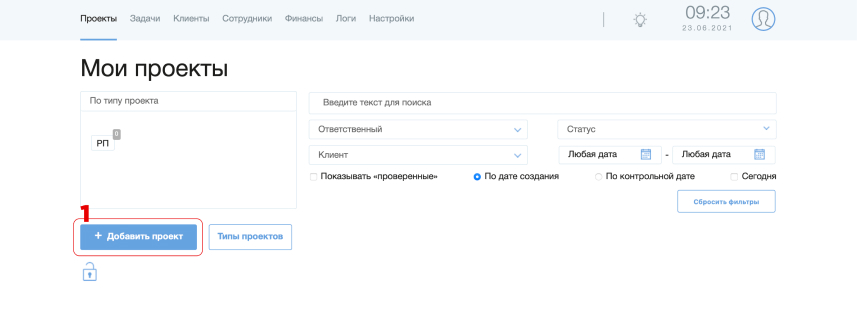
После создания типа проекта Вы можете создавать проекты данного типа, для этого нужно нажать кнопку “+ Добавить проект” на общей странице проектов.
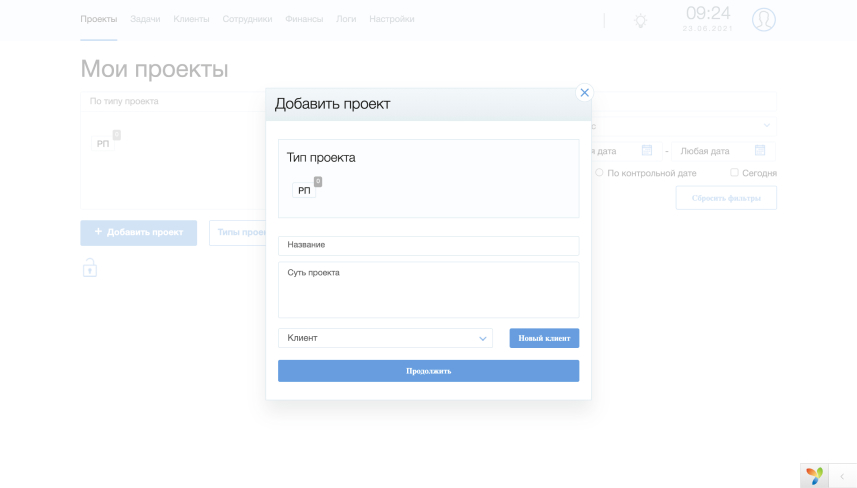
Для создания Вам будет необходимо выбрать “Раздел”, указать его название, и выбрать Клиента по данному Проекту, если же Вы создаете заказ для собственных нужд, то можете выбрать в списке клиентов самого себя(создаётся автоматически при создании системы, с пометкой “для собственных нужд”). Суть проекта указывается по желанию, в то время как все остальные поля являются обязательными к заполнению.
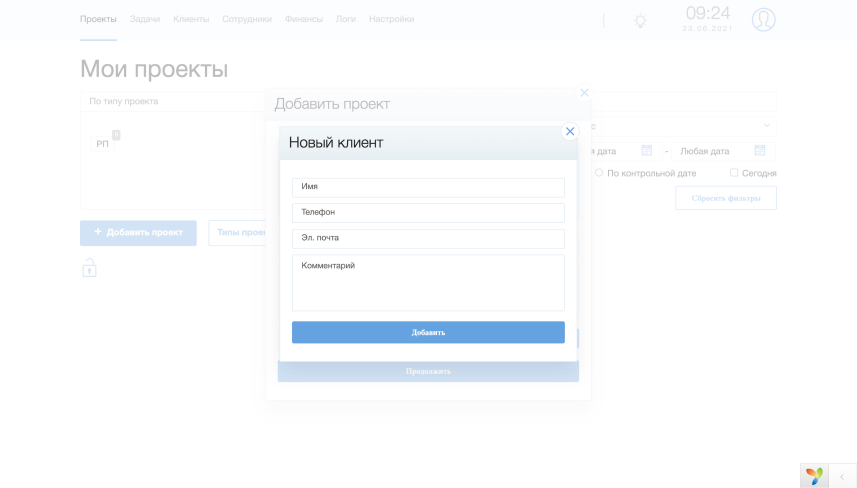
В случае если в списке клиентов нет нужно Клиента, то Вы можете легко добавить его, нажав на кнопку “+Клиент”. При добавлении клиента обязательными для заполнения являются все поля кроме поля “Комментарий”. Это сделано для того чтобы если Клиент добавляется недостаточно опытным сотрудником - он не смог забыть указать контактные данные, что впоследствии может привести к невозможности восстановления связи с Клиентом.
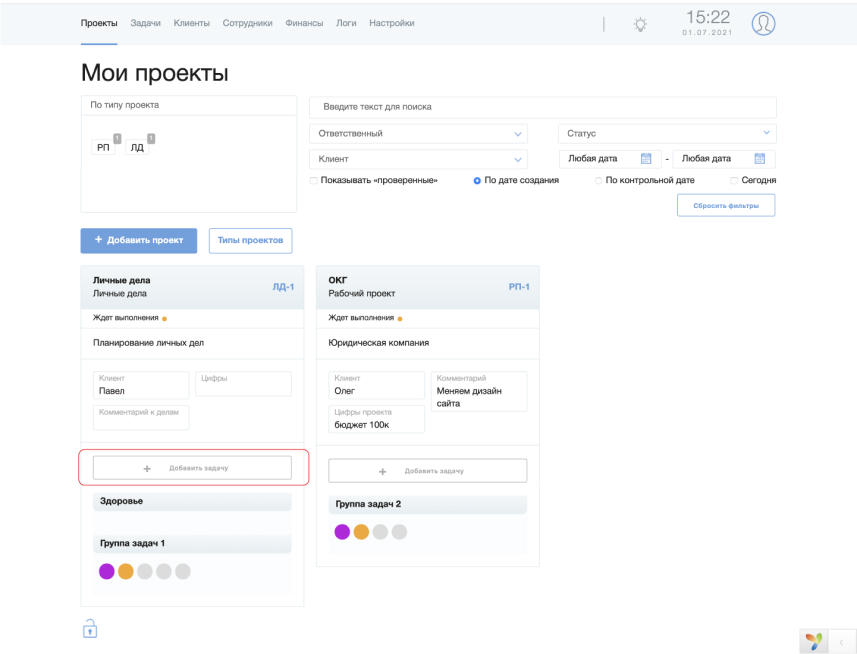
Функция добавления задач доступна в двух местах, одно из этих мест располагается в окошке проектов на странице главного меню “Проекты”, где Вы, пользуясь фильтрами можете быстро найти проект с которым хотите поработать, и не только ознакомиться со всеми задачами по данному проекту, но и добавить новые задачи, нажав на кнопку “+Добавить задачу”
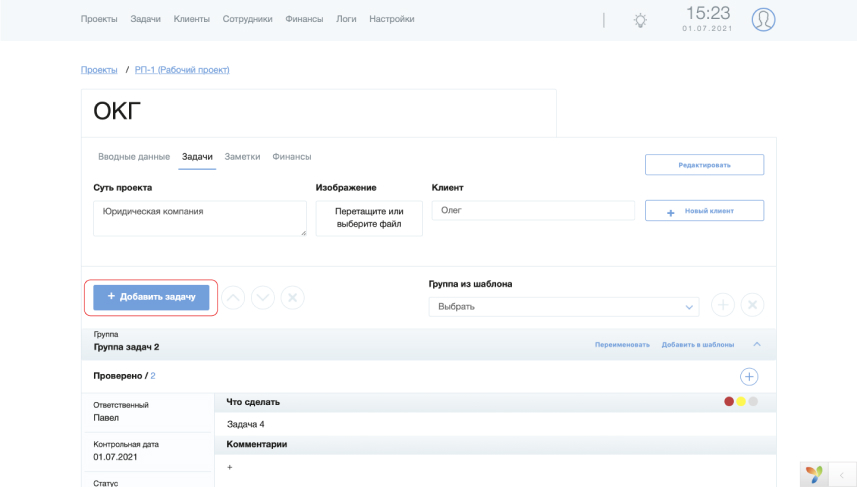
Второе место где доступно добавление задач находится в окне проекта на вкладке “Задачи”. Здесь Вы можете ознакомиться со всеми задачами по проекту, отсортированным по группам, а также посмотреть уже “Проверенные” задачи в соответствующих вкладках. Для добавления задач необходимо нажать кнопку “+Добавить задачу”
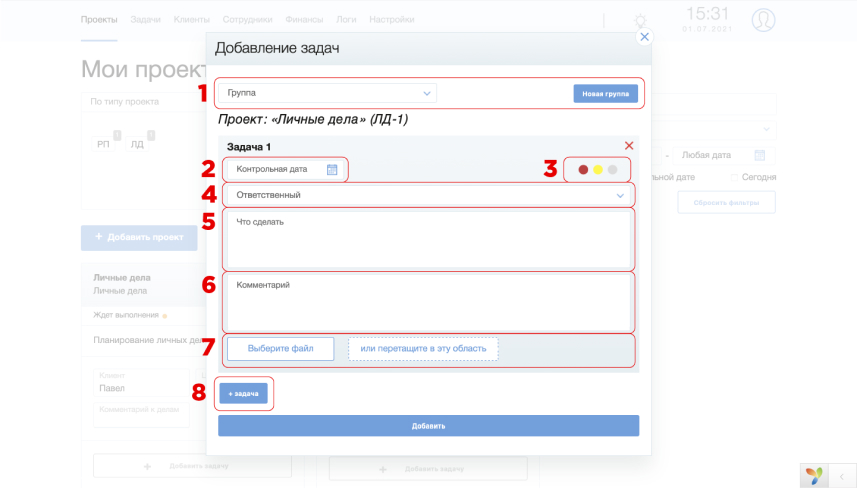
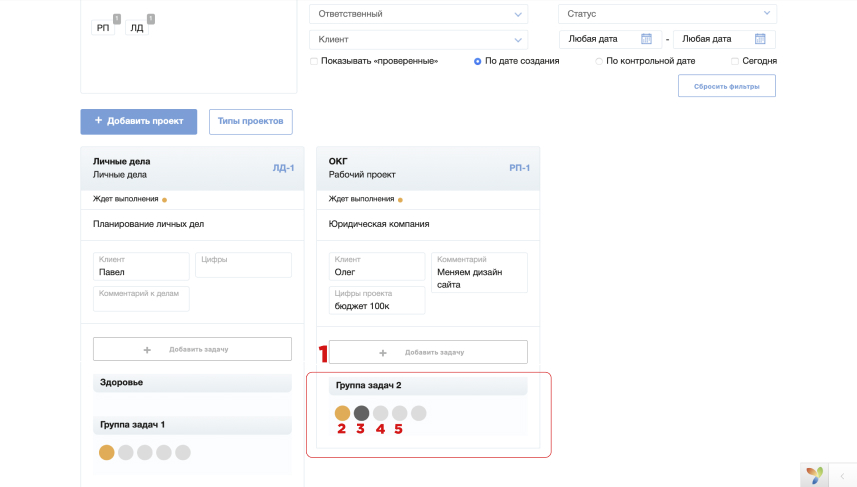
В окне добавления задач Вам будет предложено выбрать “Группу задач”(1) для добавляемой задачи. Далее установить “контрольную дату”(2), в которую задача перейдет в статус “Ждёт выполнения”, и ответственный по задаче получит уведомление об этом. По желанию Вы можете присвоить задаче один из “особых статусов”(3) “Делать первым” или “Срочно сделать”, или же снять особый статус нажав на серенький кружок.
Для каждой задачи предусмотрен свой “ответственный”(4).
В разделе “Что сделать”(5) предполагается описать суть задачи которую должен выполнить ответственный. При этом дополнительные комментарии, инструкции, фото, видео и документы могут быть приложены в разделах комментарии(6) и добавления файлов(7).
Если Вы хотите добавить целую цепочку задач, то можете сделать это не по одной задаче, а добавив сразу столько задач сколько Вам нужно, для этого после заполнения каждой задачи можно добавить ещё одну задачу, нажав на “+Задача”(8).
Для добавления типовых задач можно использовать шаблоны добавления задач на вкладке “Задачи” в окне проекта.
При добавлении цепочек задач ДЕЛАДЕЛ обработает их в соответствии с алгоритмами контроля выполнения задач, которые подробнее описаны в отдельном разделе инструкции.
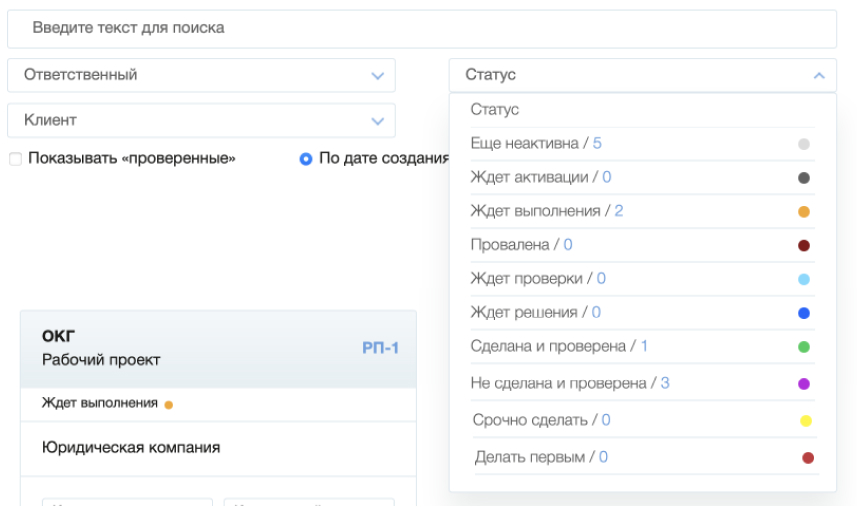
Каждая задача в системе имеет свой статус по которому можно сориентироваться в каком состоянии находится текущий процесс выполнения задачи, группы задач или всего проекта.
Ниже будут описаны все статусы системы:
“Ещё неактивна” - Статус который получает задача без указанной контрольной даты в цепочке задач. При этом данный статус подразумевает что перед этой задачей имеется задача в статусе, требующем обработки (Ждёт активации, Ждёт выполнения, Провалена, Ждёт решения). Таким образом каждая следующая задача в статусе “Ещё неактивна” будет автоматически активироваться при выполнении предыдущей задачи.
“Ждёт активации” - Задача с указанной контрольной датой в будущем.
“Ждёт выполнения” - Контрольная дата установлена на текущий день.
“Провалена” - Задача не была обработана в указанную контрольную дату. Сотрудники с правами ниже “Модератора” не смогут её обработать, до повторной активации Модератором или Администратором системы.
“Ждёт проверки” - задача была отмечена как “Сделана” и ждёт пока Модератор по данному типу проекта, или Администратор системы проверит выполнение и отметит задачу как “Проверена” и задача получит статус “Сделана и проверена”
“Ждёт решения” - задача была отмечена как “Не сделано”, и ждёт пока Модератор по данному типу проекта или Администратор системы примут решение что с ней делать дальше. Варианты решения подразумевают редактирование данных по задаче или же добавление новой задачи, или в случае если необходимость выполнения отпала - контролирующий орган может отметить задачу как “Не сделана и проверена”. В последнем случае если такая задача стояла в цепочке задач, то следующая задача будет автоматически активирована.
Особые статусы задач “Делать первым” или “Срочно сделать” устанавливаются в ручном режиме при добавлении ли при редактировании задач. В результате установки особого статуса окошко проекта окрашивается в цвет особого статуса, кружок задачи выделяется цветом особого статуса, и сам проект встаёт в начало списка проектов независимо от статусов задач в других проектах.
По-умолчанию все проекты сортируются по принципу от “худшего статуса” требующего наибольшего внимания, таким образом порядок сортировки имеет следующую структуру:
1. Ждёт решения - так как эти задачи были обработаны и по ним возникла проблема которую нужно срочно решить для того чтобы работа не стояла.
2. Провалена - задачи либо не были выполнены, либо их забыли отметить, поэтому требуется внимание.
3. Ждёт выполнения - активные задачи на сегодняшний день
4. Ждёт активации - задачи с контрольными датами в будущем.
5. Ещё не активна - задачи в цепочках групп задач.
6. Не сделана и проверена - отображаются только при включении пункта фильтров “Показывать проверенные”
7. Сделана и проверена - отображаются только при включении пункта фильтров “Показывать проверенные”
Особые статусы при установке поднимают проект с задачей в особом статусе выше всех остальных проектов и задач независимо от их статуса.
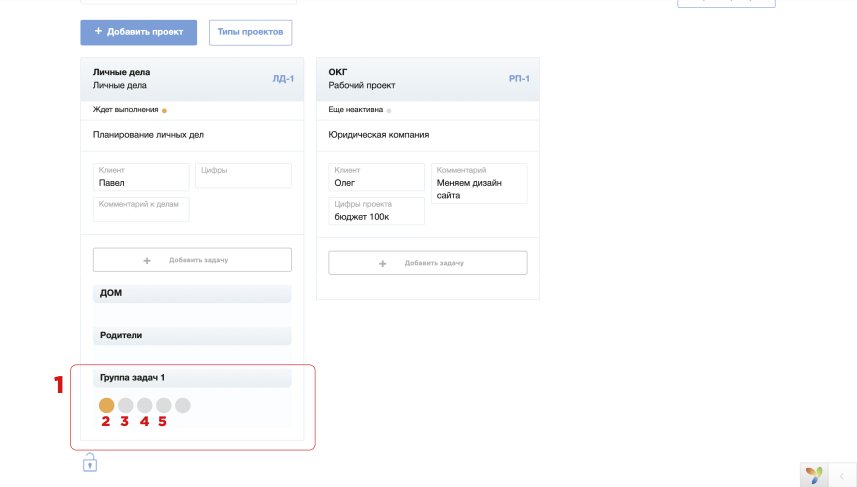
After creating “task group 1”, several tasks were added, indicated in the picture by the numbers 2,3,4,5. At the same time, no key date was selected for any of the tasks in the group. Thanks to the DELADELS NONSTOP algorithms, the key date was automatically assigned to the first task in the group with today's date. Thus, if the task is not processed, then in the morning of the next day, thanks to other task processing control algorithms, the Moderator of this Section, the Administrator and the Task Manager himself will receive notifications that the task has switched to the “Failed” status, and immediately will be able to figure out what the reason is and edit the task by setting the actual key dates. In a task group where the key date is set for only one task, each subsequent task will be activated immediately after the current task is completed. That is, as soon as a task is marked “Done”, the next task is automatically activated. If the task is marked as “Not done”, then the next task is activated either after the moderator or administrator marks the task as “not done and checked” (considering that this task is not necessary to perform), or edits the task in accordance with the current conditions, and then the next task is activated only when the current one is finally marked as “Done”. Thus, the need to control the transfer of cases from one employee to another is lost - all this will be done for you by DELADEL.
If the key date for the first task is in the future, then see how DELADEL will help with the processing of such a chain of tasks.
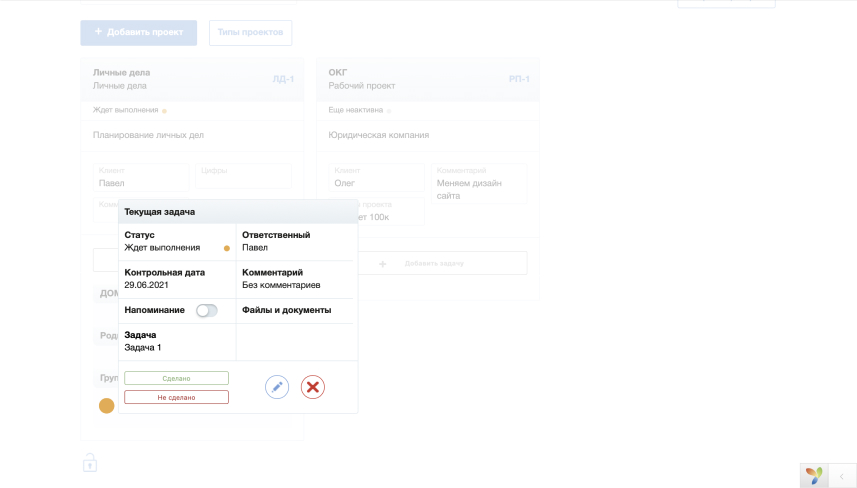
Обратите внимание на то как это выглядит на практике. Первая задача перешла в статус “Ждёт выполнения” о чем был уведомлен ответственный сотрудник.
Варианты обработки задачи предусматривают возможность отметить “Сделано” или “Не сделано” ответственному сотруднику. А так же “Редактировать” и “Удалить” для Модераторов данного типа проектов или Администратора.
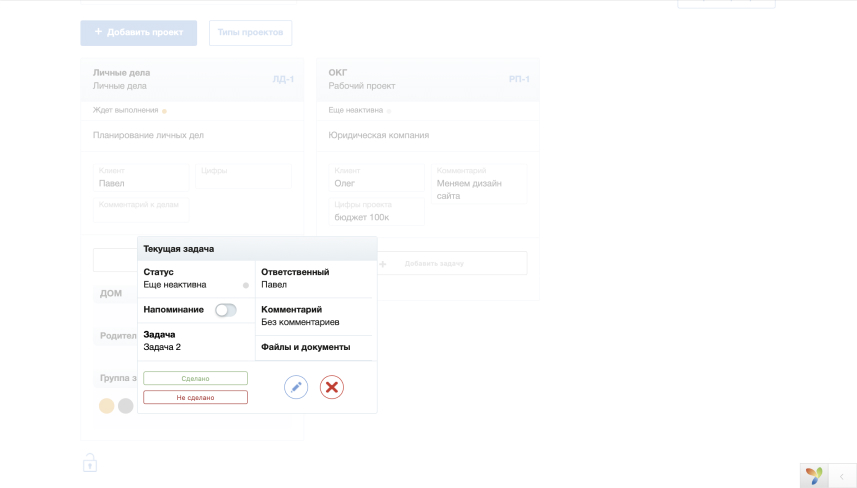
Тем временем вторая задача находится в статусе “Ещё не активна” так как контрольная дата для неё не была выбрана, и задача будет выполнена только после обработки предыдущей задачи.
Another option for working out the algorithm for monitoring the processing of tasks DELADEL NONSTOP assumes that the key date for the first task was set in the future. In this case, on the day of the key date, the task will move from the status “Waiting for activation” (pending the key date) to the status “Waiting for execution”, about which the employee responsible for the execution will immediately receive notifications by e-mail, SMS and Push in accordance with with the settings made for this project in the “Access rights and notification settings” section
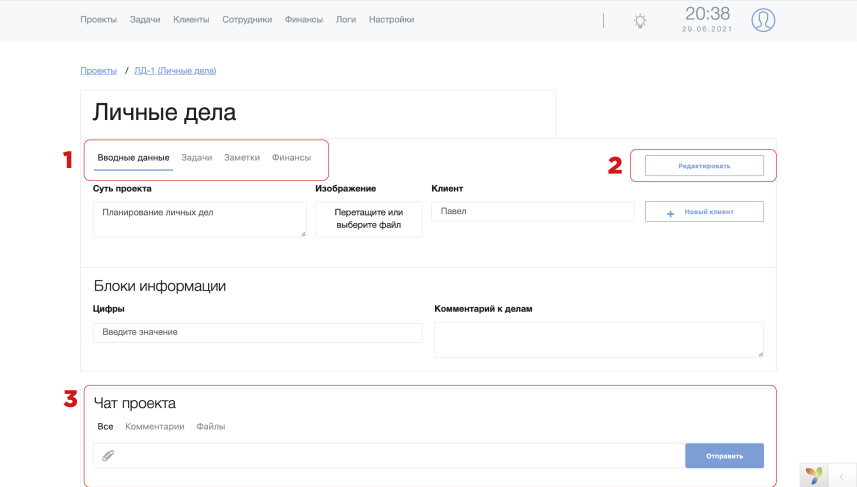
Внутреннее окно проекта содержит четыре вкладки, первая из них, которую Вы видите после создания проекта это “Вводные данные”(1). На данной вкладке можно описать “Суть проекта” которая всегда будет на виду для данного проекта, указать клиента, присвоить данному проекту определенную картинку, и заполнить блоки информации соответствующие данному типу проекта.
Для внесения изменений необходимо нажать на кнопку “Редактировать”(2).
Чат проекта(3) всегда доступен в нижней части экрана и позволяет всем сотрудникам имеющим доступ к проекту обмениваться текстовыми, голосовыми сообщениями и добавлять в чат файлы и комментарии относительно проекта.
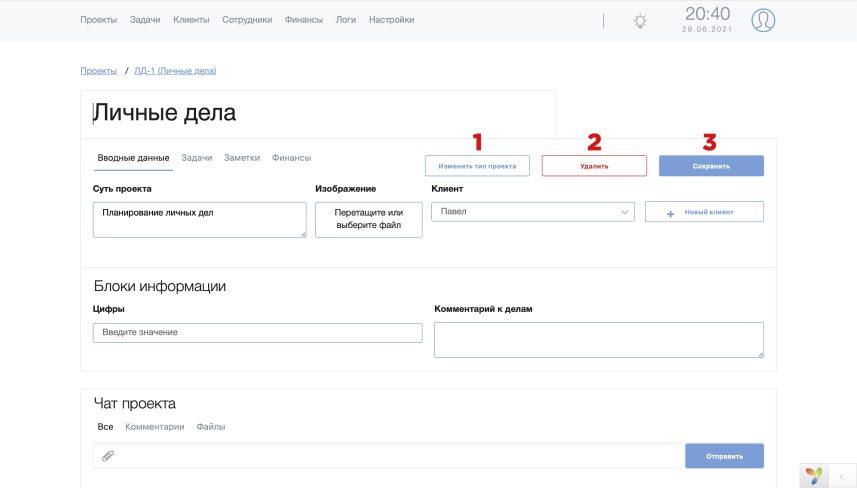
После нажатия на кнопку “Редактировать”
Вам становятся доступны для изменений все поля Вводных данных и инфоблоков. А кроме того Вы можете удалить проект нажав кнопку “Удалить”(2) или изменить Раздел нажав кнопку “Изменить Раздел”(1). Для сохранения внесенных изменений необходимо нажать кнопку “Сохранить”(3)
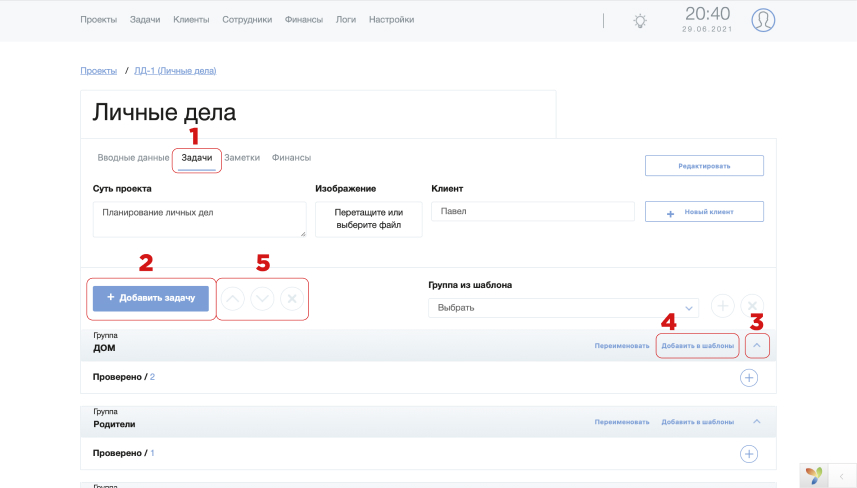
Вкладка “Задачи”(1) содержит в себе все задачи по данному проекту. Вы можете просмотреть их разверну интересующую группу задач как это показано под цифрой 3, где увидите все активные (ещё не обработанные задачи) и задачи которые уже были Проверены модератором или администратором, таким задачи находятся в отдельной подвкладке “Проверено” в каждой группе задач. Кроме того в этом разделе Вы можете добавлять задачи по одной или несколько одновременно нажав на кнопку “+Добавить задачу”(2) и добавлять целый группы задач в “Шаблоны”(4) для последующего добавления уже отработанных цепочек задач.
Для удаления группы целиком или перемещения её очередности в списке групп задач воспользуйтесь соответсвующими кнопками обозначенными цифрой “5”.
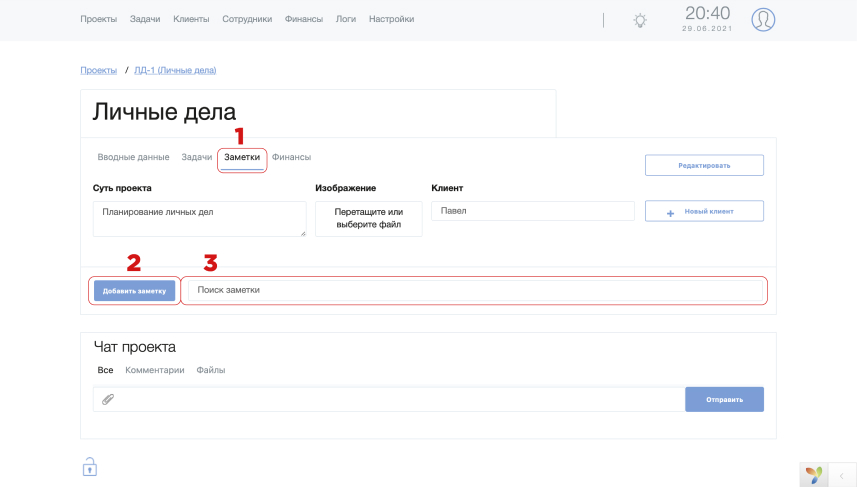
Вкладка “Заметки”(1) позволяет оставлять заметки по данному проекту в виде текстовых и голосовых сообщений, а так же прилагать документы, фото и видео, которые всегда легко и быстро можно будет найти с помощью навигации в группах заметок или воспользовавшись поиском по Заметкам (3)
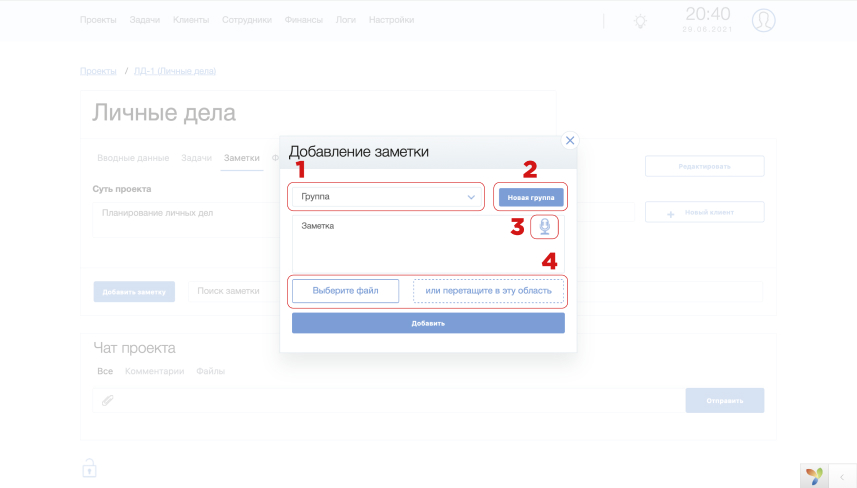
При добавлении Заметки Вам нужно будет выбрать в меню выбора группы(1) или создать группу(2) для вносимой заметки. Далее Вы можете оставить заметку в виде текста, голосового сообщения или приложить файл.
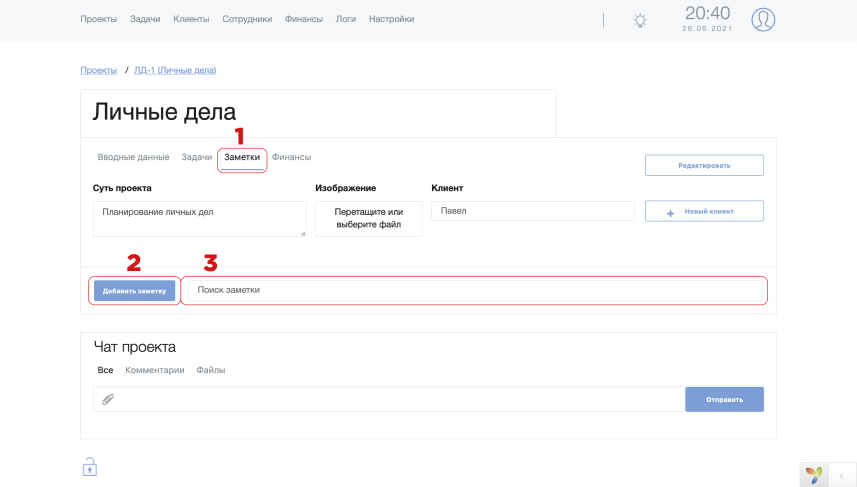
На вкладке “Финансы”(1) по проекту Вы сможете найти все приходные и расходные операции по проекту, с указанием кто и когда оформил данную операцию. Оформляются операции путем нажатия на соответствующие кнопки(3), а для поиска конкретной операции можно воспользоваться фильтрами доступными в разеле отмеченном цифрой 2.
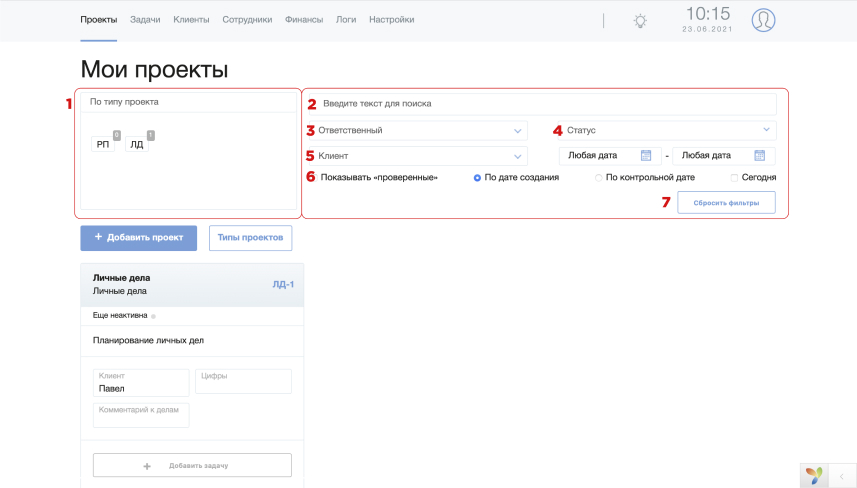
For the convenience of working in DELADEL there are filter panels “By Section” and “Other filters”, a detailed description of how they work is given below:
By Section. They are the most important filter, especially when you are driving to DELADEL in several directions at once. Selecting one of the Sections with a single click sets the filter by Section, and only projects of the selected type will immediately be displayed in the system workspace. Filters by Section are removed by clicking on this Section again, or by selecting another Section, or by pressing 7 - “Reset Filters”. Only one Section can be selected at a time, or the projects will be displayed all at once.
Поиск по тексту - осуществляет поиск заданного текста по всей системе, в том числе в Проектах, Задачах, Названиях и Комментариях.
Поиск по ответственному - при выборе одного из ответственных отобразит все задачи выбранного ответственного. Если Вы ищете задачи которые уже были выполнены - не забудьте отметить отображение уже провернных задач включив галочку, обозначенную на картинке выше под номером “6”, этот фильтр поможет Вам не только найти искомую задачу, но и посмотреть наглядную статистику Выполненных и невыполненных задач данного ответственного, или же наглядно увидеть список активных задач данного Сотрудника, для этого в дополнение к этому фильтру нужно применить фильтры по датам.
Фильтры по статусу задач - поможет отобразить только задачи в опредленном статусе, например “Ждёт выполнения” - покажет какие задачи запланировано сделать сегодня.
Поиск по Клиенту - Отобразит все проекты Заказчиком(Клиентом) по которым является выбранный заказчик. Для просмотра уже завершенных проектов(не имеющих задач без статуса “Проверено”) не забудьте включить галочку под номером “6” - отображать провернные задачи.
Галочка “показывать проверенные” включает отображение задач которые уже были проверены, и потому “по-умолчанию” скрыты из общей массы для удобства.
The “Reset filters” button - cancels all previously applied filters, as a result of which all projects are lined up in the order determined by the DELADEL algorithms, that is, in the order of priority requiring more attention (the worse the status, the more attention it requires)
Логика у этого порядка следующая:
Ждёт решения – Задача была отмечена как “Не сделано” и ответственный указал причину почему выполнить задачу не удалось. Здесь явно требуется вмешательство Администратора или Модератора для того чтобы рабочие процессы не останавливались.
Провалена – задача была проигнорирована и не была обработана никак. Здесь придётся устанавливать причины игнорирования и несоблюдения порядка работы в системе.
Ждёт выполнения – задачи которые требуется выполнить сегодня.
Ждёт активации – у задачи указана контрольная дата в будущем, то есть она не требует внимания и всё идёт своим чередом.
Ещё не активна – задача которая стоит в очереди на выполнение и будет активирована при выполнении предыдущей задачи.
Особые статусы – устанавливаются для задач требующих особого отношения, и выполняют следующие действия:
ДЕЛАТЬ ПЕРВЫМ – окрашивают окошко проекта в красный цвет и поднимают его на первое место независимо от статусов других задач в этом и других проектах.
Срочно сделать – окрашивают окошко проекта в желтый цвет и поднимают его на первое(второе если есть проекты в статусе “ДЕЛАТЬ ПЕРВЫМ”) место независимо от статусов других задач в этом и других проектах.
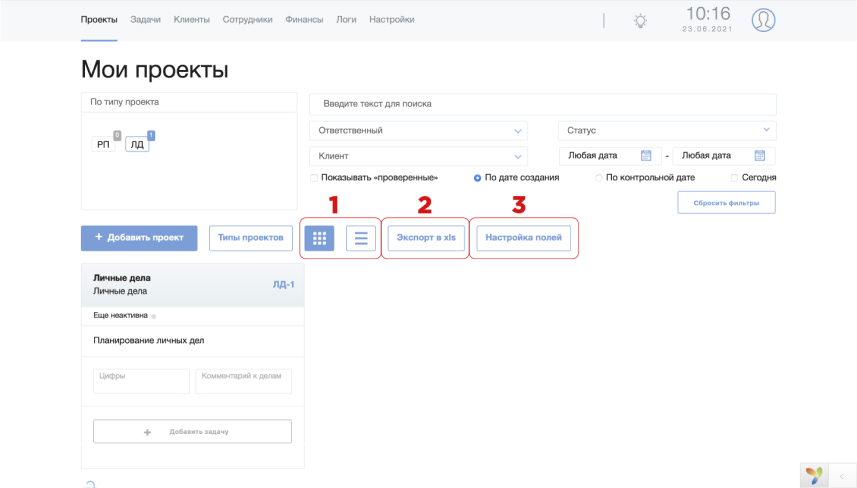
После выбора в фильтре по типу проекта определенного типа проекта Вы можете настроить вид отображения окошек, выбрав плиточный вид или строчный, для этого нужно выбрать один из двух типов указанных в панели выбора - 1.
2 – Нажатие кнопки “Экспорт в xls” выгрузить всю отфильтрованную информацию в файл Excel
3 – Настройка полей предполагает возможность выбора какие разделы инфоблоков свойственных для данного типа проектов нужно отображать в окошках проектов. Вся невыбранная информация останется доступной на вкладке “Вводные данные” внутри проекта.
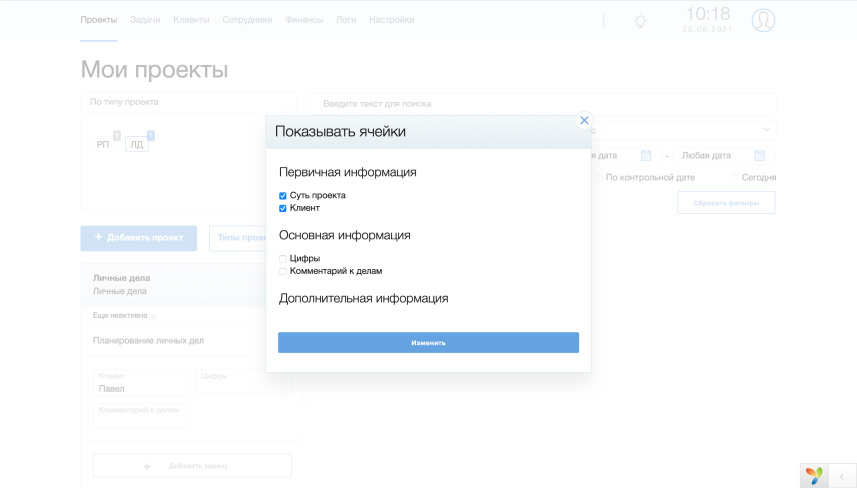
Отмеченные галочками инфоблоки будут отображаться в окошке проекта, остальные будут доступны на вкладке “вводные данные” внутри проекта.

На общей вкладке задач можно отобразить только задачи без информации по самим проектам в целом. Здесь так же доступны панели фильтров как и на общей странице проектов.
Для удобства работы предусмотрены панели фильтров “По типу проекта” и “Прочие фильтры”, подробное описание того как они работают приведено ниже:
By Section. They are the most important filter, especially when you are driving to DELADEL in several directions at once. Selecting one of the Sections with a single click sets the filter by Section, and only projects of the selected type will immediately be displayed in the system workspace. Filters by Section are removed by clicking on this Section again, or by selecting another Section, or by pressing 7 - “Reset filters”. Only one Section can be selected at a time, or the projects will be displayed all at once.
Поиск по ответственному - при выборе одного из ответственных отобразит все задачи выбранного ответственного. Если Вы ищете задачи которые уже были выполнены - не забудьте отметить отображение уже провернных задач включив галочку, обозначенную на картинке выше под номером “6”, этот фильтр поможет Вам не только найти искомую задачу, но и посмотреть наглядную статистику Выполненных и невыполненных задач данного ответственного, или же наглядно увидеть список активных задач данного Сотрудника, для этого в дополнение к этому фильтру нужно применить фильтры по датам.
Фильтры по статусу задач - поможет отобразить только задачи в опредленном статусе, например “Ждёт выполнения” - покажет какие задачи запланировано сделать сегодня.
Поиск по Клиенту - Отобразит все проекты Заказчиком(Клиентом) по которым является выбранный заказчик. Для просмотра уже завершенных проектов(не имеющих задач без статуса “Проверено”) не забудьте включить галочку под номером “6” - отображать провернные задачи.
Галочка “показывать проверенные” включает отображение задач которые уже были проверены, и потому “по-умолчанию” скрыты из общей массы для удобства.
The “Reset filters” button - cancels all previously applied filters, as a result of which all projects are lined up in the order determined by the DELADEL algorithms, that is, in the order of priority requiring more attention (the worse the status, the more attention it requires)
Логика у этого порядка следующая:
Ждёт решения – Задача была отмечена как “Не сделано” и ответственный указал причину почему выполнить задачу не удалось. Здесь явно требуется вмешательство Администратора или Модератора для того чтобы рабочие процессы не останавливались.
Провалена – задача была проигнорирована и не была обработана никак. Здесь придётся устанавливать причины игнорирования и несоблюдения порядка работы в системе.
Ждёт выполнения – задачи которые требуется выполнить сегодня.
Ждёт активации – у задачи указана контрольная дата в будущем, то есть она не требует внимания и всё идёт своим чередом.
Ещё не активна – задача которая стоит в очереди на выполнение и будет активирована при выполнении предыдущей задачи.
Особые статусы – устанавливаются для задач требующих особого отношения, и выполняют следующие действия:
ДЕЛАТЬ ПЕРВЫМ – окрашивают окошко проекта в красный цвет и поднимают его на первое место независимо от статусов других задач в этом и других проектах.
Срочно сделать – окрашивают окошко проекта в желтый цвет и поднимают его на первое(второе если есть проекты в статусе “ДЕЛАТЬ ПЕРВЫМ”) место независимо от статусов других задач в этом и других проектах.
8 – Кнопка экспорт в xls выгрузить в файл Excel всю отфильтрованную с помощью фильтров информацию.
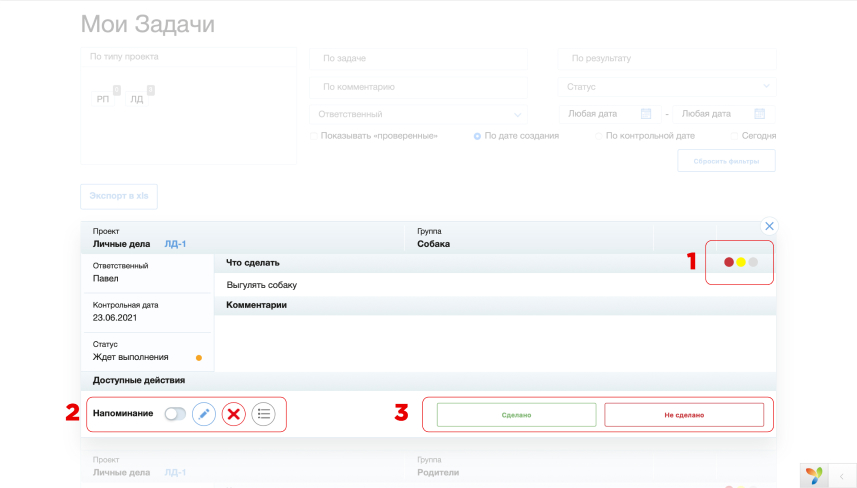
Окошки задач имею несколько функциональных зон:
1. Кнопки установки особого статуса задаче:
> Можно установить статусы “ДЕЛАТЬ ПЕРВЫМ”, “Срочно сделать” или снять ранее присвоенные статусы.
2. В этой зоне можно установить дополнительное напоминание о задаче, отредактировать её, удалить задачу, а так же посмотреть всю историю изменений по задаче от моменты создания.
3. Кнопки обработки задач. Если задача была Выполнена то ответветнный по задаче должен нажать что “Сделано” и описать что именно было сделано, если же задача в силу каких-либо причин не могла быть успешно выполнена то Ответственному нужно нажать “Не сделано” и описать “Почему задача не была сделана”.
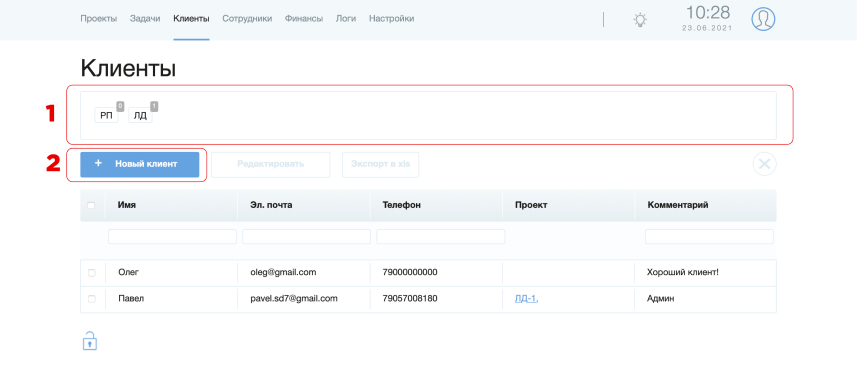
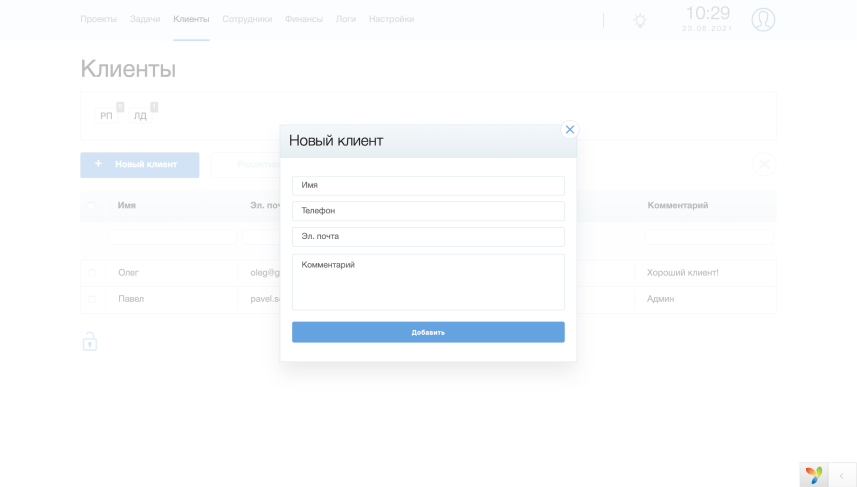
На вкладке Клиенты мы может отфильтровать для просмотра/редактирования Клиентов по типам проектов. Кнопка
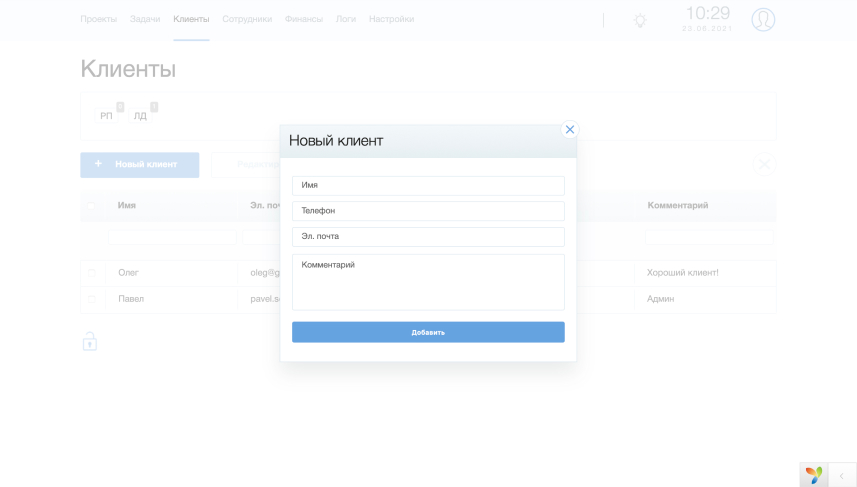
“новый клиент” поможет добавить нового Клиента.
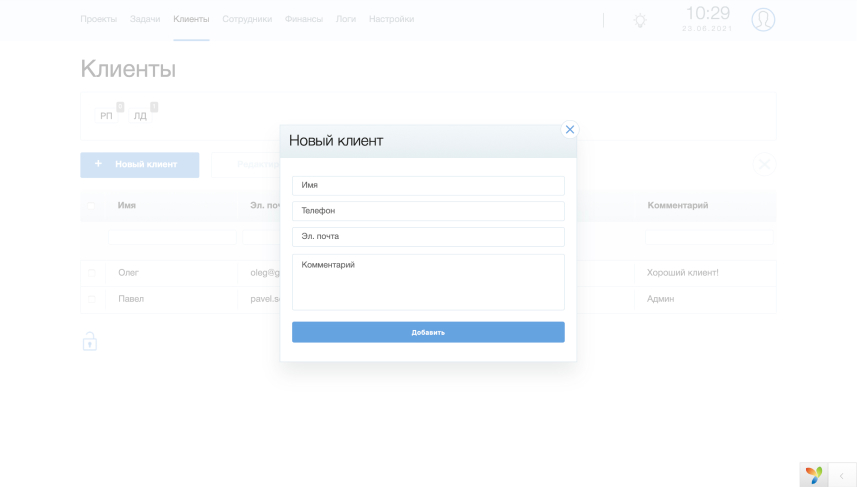
Вы можете легко добавить Клиента, нажав на кнопку “+Клиент”. При добавлении клиента обязательными для заполнения являются все поля кроме поля “Комментарий”. Это сделано для того чтобы если Клиент добавляется недостаточно опытным сотрудником - он не смог забыть указать контактные данные, что впоследствии может привести к невозможности восстановления связи с Клиентом.
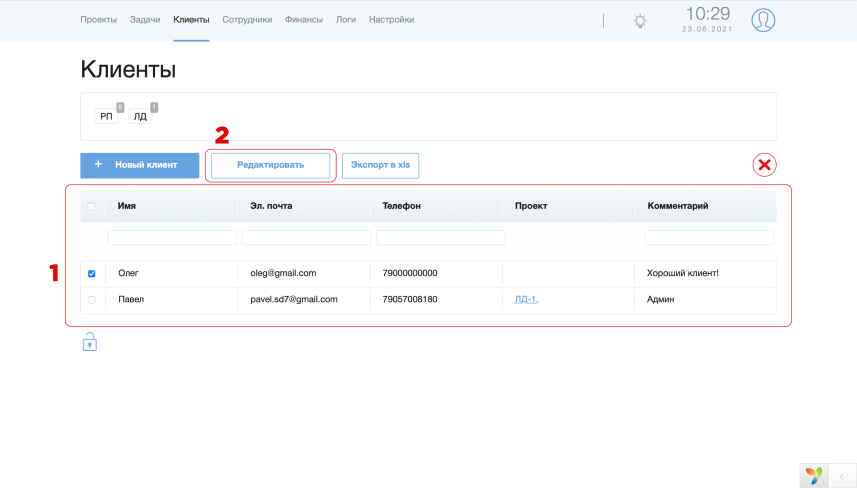
Выделение клиентов галочкой (1) позволят отредактировать данные по выбранному клиенту нажав на кнопку “Редактировать”(2)
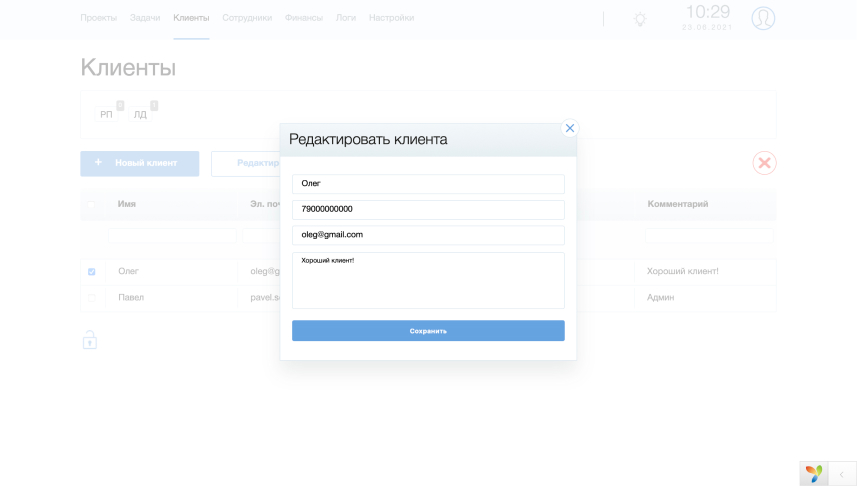
Редактирование данных клиента подразумевает тот же набор правил что и при добавлении клиента.
1. В панели фильтров Вы сможете быстро найти клиента по имени, адресу почты, телефону или комментариям. А также посмотреть какие именно проекты относятся к данному заказчику.
2. С помощью кнопки удаления Вы можете удалить одного или несколько выбранных клиентов и Вашей базы данных.
3. С помощью кнопки “Экспорт в xls” можно выгрузить информацию по выбранным клиентам в таблицу эксель.
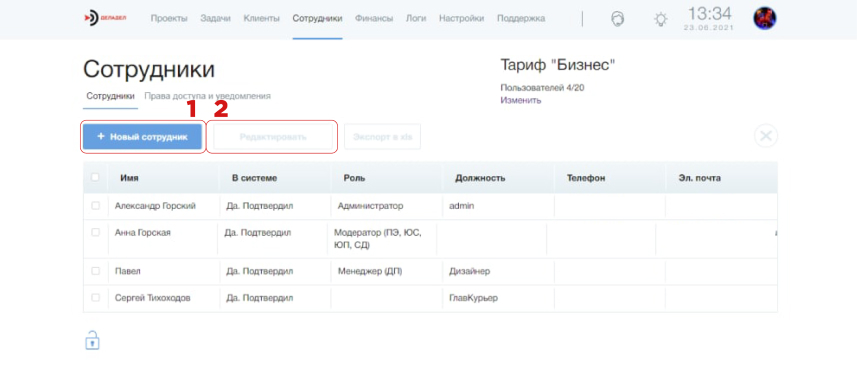
На вкладке “Сотрудники” расположены две вкладки, первая из них “Сотрудники” предусматривает возможность добавления пользователей в систему(только в тарифах “Старт”, “Бизнес”, “Корпоративный”), редактирования данных сотрудников((кнопка “Редактировать”(2)), также здесь доступны контактные данные сотрудников, и сводная информация о ролях в системе.
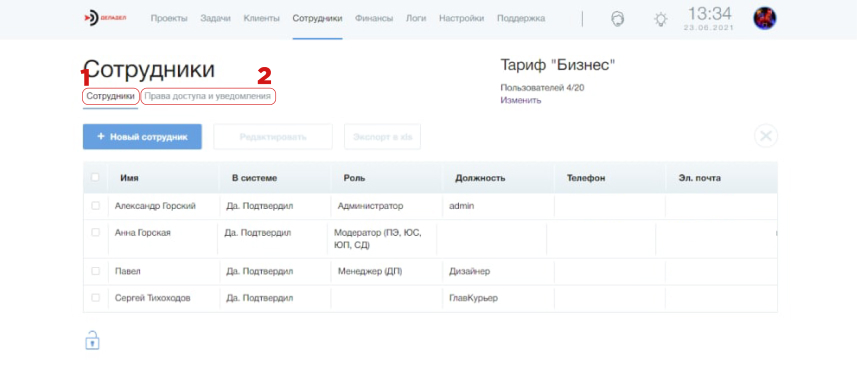
Для перемещения со вкладки “Сотрудники”(1) на вкладку “Права доступа и уведомления”(2) нужно выбрать соответствующий раздел.
Notification settings are initially configured in such a way that no task can remain unprocessed. This is achieved by sending notifications to the user responsible for the execution that he has a task in the “pending” status, and if the task was ignored or could not be completed for any reason, DELADEL will send appropriate notifications to the moderator for this Section and the system administrator, so that the employees who control the execution can make prompt decisions about the reasons for the non-completion of the task and solve them in one way or another, for example, by reactivating the task with a new key date, or by editing other task parameters. You can learn more about the algorithms of the integrated system for monitoring the processing of tasks "DELADEL NONSTOP" in the corresponding section of this manual.
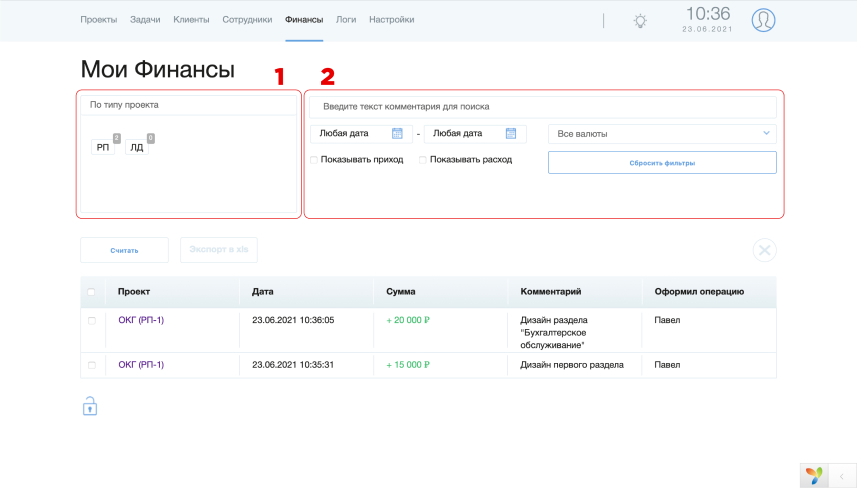
Общая вкладка финансов имеет панель фильтров по типу проекта, выбор которой позволит посмотреть все приходно-расходные операции по выбранному типу проектов, и панель дополнительных фильтров для быстрого поиска конкретной операции.


Выбранные галочками (1) данные по операциям можно просуммиировать нажав на кнопку “Считать”(2), результат будет доступен в соответсвующем окошке(4). Так же предусмотрена возможность экспортировать выбранные данные в Excel с помощью нажатия на кнопку “Выгрузить в xls” (3)

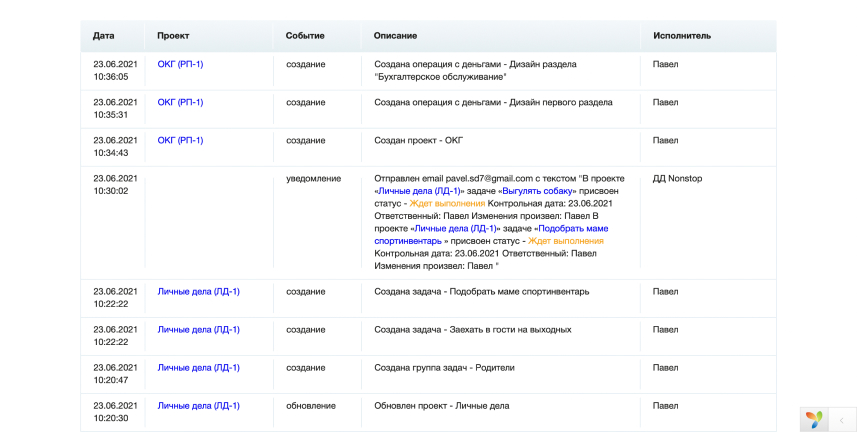
Вкладка логи содержит фильтры по типам проектов, и панель дополнительных фильтров для быстрого поиска истории изменений. Содержащиеся в этом разделе данные содержат всю информацию по сделанным системе изменениями и совершенным дествиям пользователей и самой системы в рамках работы с проектами и задачами от создания до удаления. Данный раздел не редактируется и в случае возникновения спорных рабочих моментов всегда поможет восстановить хронологию событий с достоверностью до секунды.
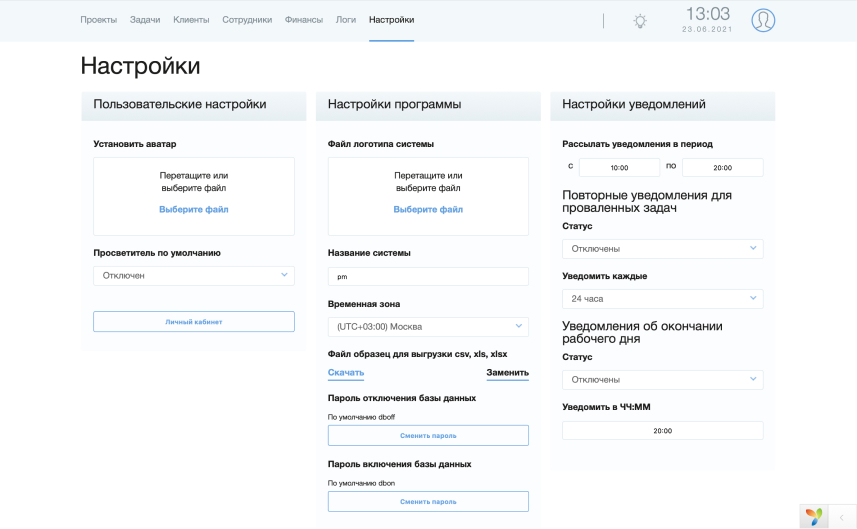
На вкладке “Настройки” доступны следующие разделы:
1. Пользовательские настройки
1.1 Выбора аватара - Загруженное изображение будет отображаться в Вашей системе в правом верхнем углу, а так же рядом с Вашим именем в задачах где Вы являетесь ответственным.
1.2 Выбор “Просветитель по-умолчанию” включает и отключает отображение вспомогательных обучающих видео функции “Просветитель” при входе в систему.
2. Настройка программы
2.1 Selecting the system logo - the logo chosen by you as the system administrator will be displayed in the upper left corner of your DELADELP.
2.2 Наименование системы - параметр который отображается при авторизации в окне выбора системы, имеет эстетический характер и выбирается администратором самостоятельно.
2.3 Time zone allows you to select the server time for your version of the system. DELADEL will send notifications according to the rules specified in the settings based on the server time that you can set in this window.
2.4 Файл образец выгрузки XLS это шаблон файла в который происходит выгрузка выбранной информации при нажатии на “Экспорт в XLS”. Вы можете скачать действующий образец, отредактировать его и загрузить обратно, после чего выгружаться информация будет уже в Ваш шаблон.
2.5 Пароли отключения базы данных помогут защитить Ваши данные в случае необходимости. Рекоммендуется поменять эти пароли на известные только Вам и в случае необходимости Вы можете нажать на значок “замочек” в левом нижнем углу системы, и введя пароль на отключение Ваш ДЕЛАДЕЛ окажется абсолютно пуст, и так будет вплоть до момента когда Вы введёте пароль на включение базы данных.
3. Настройки уведомлений
3.1 Send notifications during the period - here you specify the time interval in which you would like to receive your morning to-do list for the current day, and receive a warning about the imminent end of the working day. During the time outside the specified framework, DELADEL will not send you any notifications.
3.2 Повторные уведомления о проваленных задачах - при включенной функции уведомления о том что какая-либо задача была проигнорирована(никак не обработана) будут приходить ежедневно вплоть до момента пока задача не будет обработана в каком-то виде.
3.3 Уведомления об окончании рабочего дня - пришлет сообщения на почту о том что рабочий день скоро заканчивается и нужно обработать все задачи в статусе “Ждёт выполнения” чтобы они не перешли в статус “Провалена”
3.3.1 Время в которые должны приходить уведомления о скором завершении рабочего дня.

Попасть в “личный кабинет” можно двумя путями:
> Кликнуть на аватар в правом верхнем углу
> Нажав на кнопку “Личный кабинет” в разделе “Настройки”
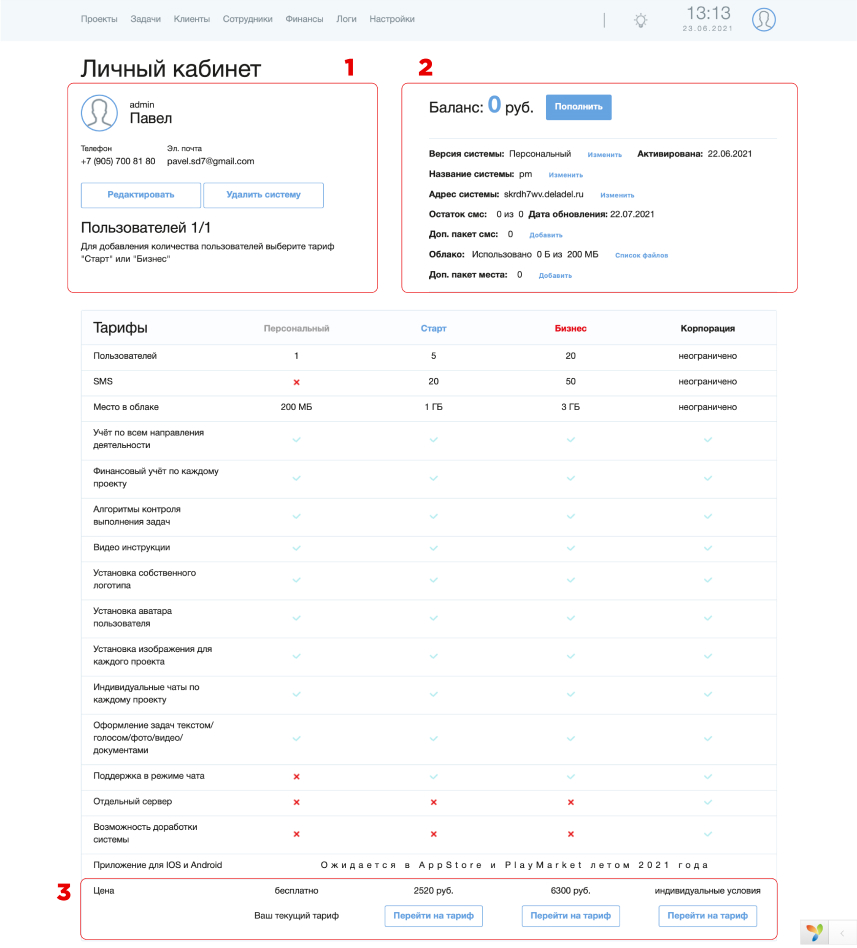
Личный кабинет содержит следующие блоки:
1. Данные пользователя которые можно изменить при нажатии на кнопку “Редактировать”
2. Кнопка “Удалить систему” - удалит всю систему со всеми данными(функция доступна только администратору системы). Баланс личного кабинета при это останется сохранным.
3. Системная информация содержит следующие сведения:
> О текущем тарифе
> О дате активации тарифа - в эту дату произойдет обновление пакетов услуг и следующее списание средств с баланса при использовании платной версии системы.
> Название системы отображаемое в окне выбора систем
- address of the system - anyone who is not busy can be selected, and you can get into the system directly by clicking on the link “mysystem.deladel.ru”, although of course you will have to log in regardless of the chosen login method.
> Остаток СМС по основному тарифу - остаток СМС которые включены в тариф и ежемесячно обновляются
> Остаток доп. пакета СМС - в случае если Вам не хватило СМС и Вы подключили доп. пакет - эти смс не “сгорают” и закончатся только тогда когда Вы используете весь подключенный дополнительно пакет или удалите систему.
> Облако – показывает сколько из включенного в тариф места Вы уже использовали в данной системе
> Доп. место – возобновляемый пакет дополнительного места, которое можно использовать для хранения файлов разных форматов в том числе документов, фото и видеоматериалов.
> Все файлы Вашей системы доступны при нажатии на кнопку “Список файлов”
Таблица тарифов с их полным описанием и возможность подключить любой из базовых версий, или обратиться для подключения корпоративной версии на индивидуальных условиях.

Контроль доступа к данным Вашей системы всегда остаётся в Ваших руках, и Вы можете отключить или включить базу данных нажав на значок замочка доступный в левом нижнем углу основных страниц системы. Для отключения базы данных потребуется ввести пароль на отключение, а для включения пароль на включение. Обратите внимание на то что эти пароли разные и устанавливаются администратором системы в разделе “Настройки”.
